Tightening Screws and Bolts
I know what you're thinking... you're thinking "you twist the screwdriver until it stops twisting", and that's probably not the worst thing, but there is, weirdly enough, some details that can improve your screw (or bolt) tightening game. To start, we can look at the forces in a bolted joint:
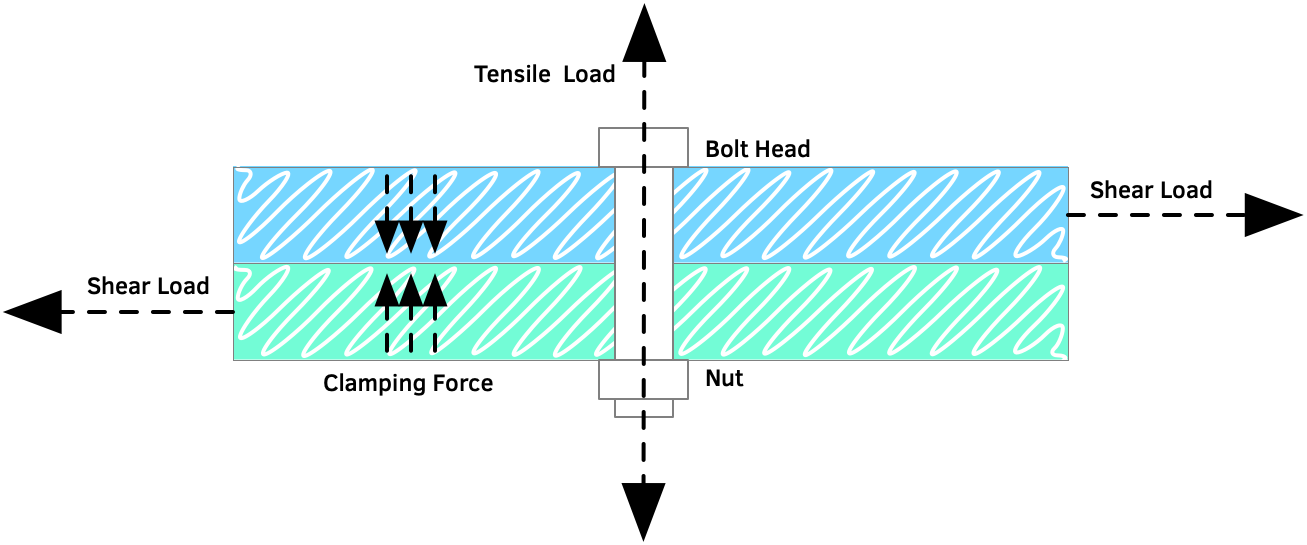
We have a couple of forces at play here:
- Clamping force. This is the force being exerted by the bolt to hold the two plates together. It should, ideally, be enough to incur a high enough friction force to prevent the plates from shearing.
- Shearing load. This is the force that occurs when you have two bodies acting in opposing directions against one another.
- Tensile load. This is the force we are putting on the bolt (in this case), which causes the bolt to elongate and exert the clamping force.
Order of Tightening
First, the order of tightening matters. Why? Because the goal is to distribute both the load and stresses as evenly and consistently across the joint as possible with the screws or bolts provided. They break down into basically two patterns. One for circular arrangements and another for rectangular arrangements.
For circular arrangements, you want to follow what, to me, looks like a pentagram pattern. I think the official designation is "criss-cross", but I like seeing it as dark arcana. I've drawn out the ordering in the diagram below for a 6-bolt flange joint, but a similar pattern can be used with any other number of bolts or screws.
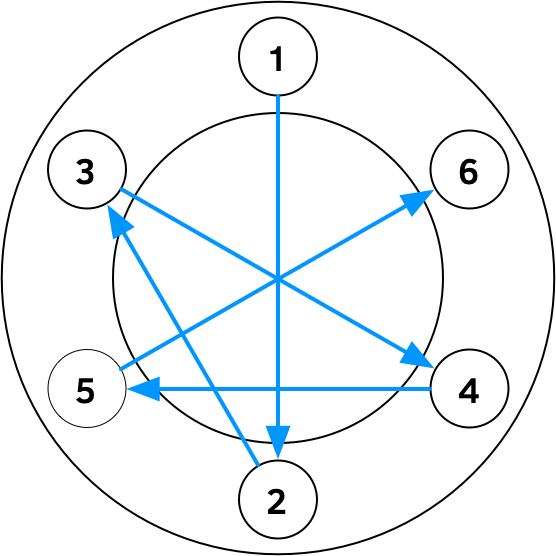
The goal is to make sure you basically go to the furthest bolt from the one you just tightened, alternating "sides" as much as possible.
For a rectangular joint, you use a slightly different approach. Instead of all the diagonals, you want to use a "spiral" from the inside out on the joint. In the diagram below, I show how that would look for an 8 bolt joint. Again, this generalizes.
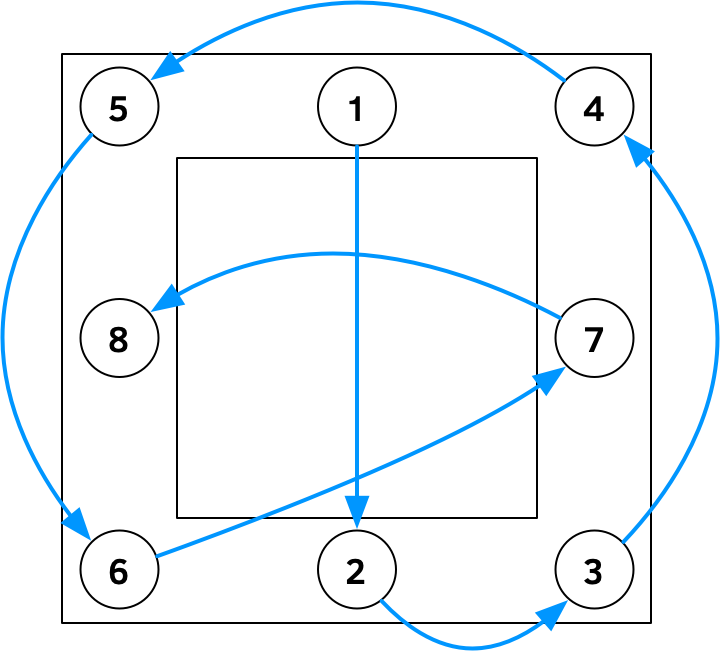
For hobbyist uses, just do your best to follow something like this. It will result in sturdier, more durable, and less likely to loosen joints.
Multiple Passes
Typically, if you're trying to get the most even loading on a joint, you don't want to do all the tightening in a single pass. While there are a lot of recommendations you can look into if you're interested (see below) that depend on using a torque wrench, you can take the following as a good rule-of-thumb:
- First pass to what people will call "finger tight". This means to tighten something using only two fingers. This is when the free play in a joint is effectively gone. In absolute, this would be 20-30% of your target torque, but without a torque wrench/screwdriver, you can just estimate.
- The second pass, in the same pattern, to 50% of full torque load.
- A third pass to bring it to the final torque load.
Truthfully, I typically only do it in two passes typically, unless it's something like a metal-on-metal joint with bolts where I know the actual torque requirements. For hobbyist use, just 2 passes is typically enough.
When doing serious industrial tightening, you would add a 4th pass to this, in a different pattern, to ensure everything is tightened down correctly. Because of how joints load, as you tighten another bolt or screw, you can end up shifting the loads in previously tightened ones.
Holding Joints with Loctite
Sometimes (often) you want to ensure that the bolt or screw doesn't come out due to vibration or stresses. There's a few different ways to do this, but here I want to discuss the two easiest and most common in the hobby world: Loctite Threadlocker Blue 242 and Loctite Threadlocker Red 271. While there are other products, these two will get you very far in making things not come apart until you want them to.
The two materials behave very similarly, but have two distinct use cases:
- Loctite Blue 242. For a vast majority of uses cases, this is the one you want. It's designed for situations where you want to be able to take something apart for service, but you want to reduce the likelihood of it loosening on its own.
- Locktite Red 271. This is for a much more permanent joint, and really can't be removed without using a blowtorch and heating something to 260C (500F). Obviously, you can't do that with plastic parts, so it is, for all intents, permanent.
The use of each of them is basically a couple of steps:
- Clean both sides of the joint/part. I find IPA works really well for this in most cases.
- Shake the little bottle for 20-30s. It's a suspension, so you want to make sure it's dispersed evenly.
- Apply a very small amount to the threaded side of the joint, for example, the screw. The surface tension should be enough to hold it in place. If it drips, you've added too much. It'll work, but it's not a cheap product, so it pays to be a bit more frugal.
- Screw/bolt it together.
- Let it cure for 24h.
Like other things in this group of acrylates (think superglue), it has a short "set time" (10m), but a much longer cure time to reach its full potential.
Alternatives to Loctite
I have seen people use cyanoacrylate (superglue) to do the same thing, and while it will "work", it is definitely a less desirable from a mechanical properties perspective. Cyanoacrylate has very low shearing strength. This is specifically the strength you need to hold screws and bolts in place. While the screw or bolt may be undergoing torsional stress, the material is under sheering stress. So, while it will be stronger than one without it, it won't be in the same category as Loctite here.
Anti-Seize Compounds
Just as you might want to make sure a screwed or bolted joint doesn't come loose accidentally, you might need to make sure that it doesn't seize up and become impossible to remove. You don't typically need something like this in most hobbyist or small projects, but it is something to be familiar with if you start to work with much larger things. It is especially important to consider when a joint is going to be under some kind of environmental stress (temperature shifting, corrosive fluids, etc). In those cases, it can accelerate the deterioration of the joint, and you can end up not being able to remove it. You can read more about anti-seize compounds.
Common Torque Limits
Check with Manufacturer
The table below is just some rough rules-of-thumb, nd you should definitely check with specific manufacturers for their recommended torque settings.
| Use Case | Torque Target |
|---|---|
| Attaching a PCB to a mount point. | 0.6Nm (0.44 ft-lbs) |
| Putting case pieces together with screws | 1.0Nm (0.74 ft-lbs) |
Comments or Questions?
If you have any comments, questions, or topics you'd like to see covered, please feel free to either reach out to me on Mastodon (link below) or open an issue on Github.