Joining Parts
When joining parts, there's one question you need to start with: is this reversible? That will guide you down the path of what technique to use. There are a couple of ways to join parts together, each with trade-offs:
- Press fit. Typically non-reversible.
- Snap fit. Reversible.
- Glue. Non-reversible.
- Screws. Reversible.
Press Fit
If you can get the mechanical fit setup correct, then you may be able to use an interference fit and stick things together without any other mechanism. Unfortunately, you also run the risk of breaking the parts doing this, so I strongly advise against it.
Snap-Fit
Snap-fit is a common way of making injection-molded parts fit together, but it can also be used in 3D printing. A snap-fit set of pars usually consists of a protrusion and a mating depression, generating an interlocking connection that often relies on parts that bend. There are many guides on creating them, but I like this one as a start.
Glue
Using glue is a great option, and there are three primary glues that are commonly used:
- Cyanoacrylate ("super glue")
- UV-set epoxy. I like Bondic.
- Hot glue, which is a thermopastic](https://en.wikipedia.org/wiki/Thermoplastic) and not a traditional adhesive.
Each of these has trade-offs, but the first two are the most durable and strongest. The hot glue is useful for more temporary things, or things where there will not be much stress on the joint.
Screws
Screws are a great way to join two or more printed parts together in a semi-permanent fashion. There are a few possibilities in how you can screw them together that I'm going to cover here. Stefan over at CNC Kitchen has done a good comparison of various techniques from a strength perspective.
Just Screw It In
Honestly, you can just screw it in, and certainly, a self-tapping screws](https://en.wikipedia.org/wiki/Self-tapping_screw) should work. Unfortunately, this is not a super repeatable process, and should only be used if you plan to remove it once or twice at most.
Tapping Holes
The next option is to use a tap-and-die set pre-cut the threads into the printed part. This will reduce the tension in the part, and ensure a much cleaner join as the taps are very sharp. For the best results, you'll want to tap the hole twice. The first time using either a plug or taper tap, and the second time using a bottoming tap. The first will make sure 90% of the threads are cut, and the bottoming tap will ensure the last few at the bottom are cut properly. If you try to use a bottoming tap by itself, you'll find that it will struggle to get the initial bite into the material and stay straight. I'll be honest, though, that I typically just use one tap and call it "good enough" since the last few threads can be cut by the screw itself.
To help explain it, I made a small video:
Threaded Inserts
My favorite is to use brass threaded inserts. These are inserts that are heat set into the printed part and provide a durable and repeatable joint. The ones I like are from Stefan at CNC Kitchen, and look like this:
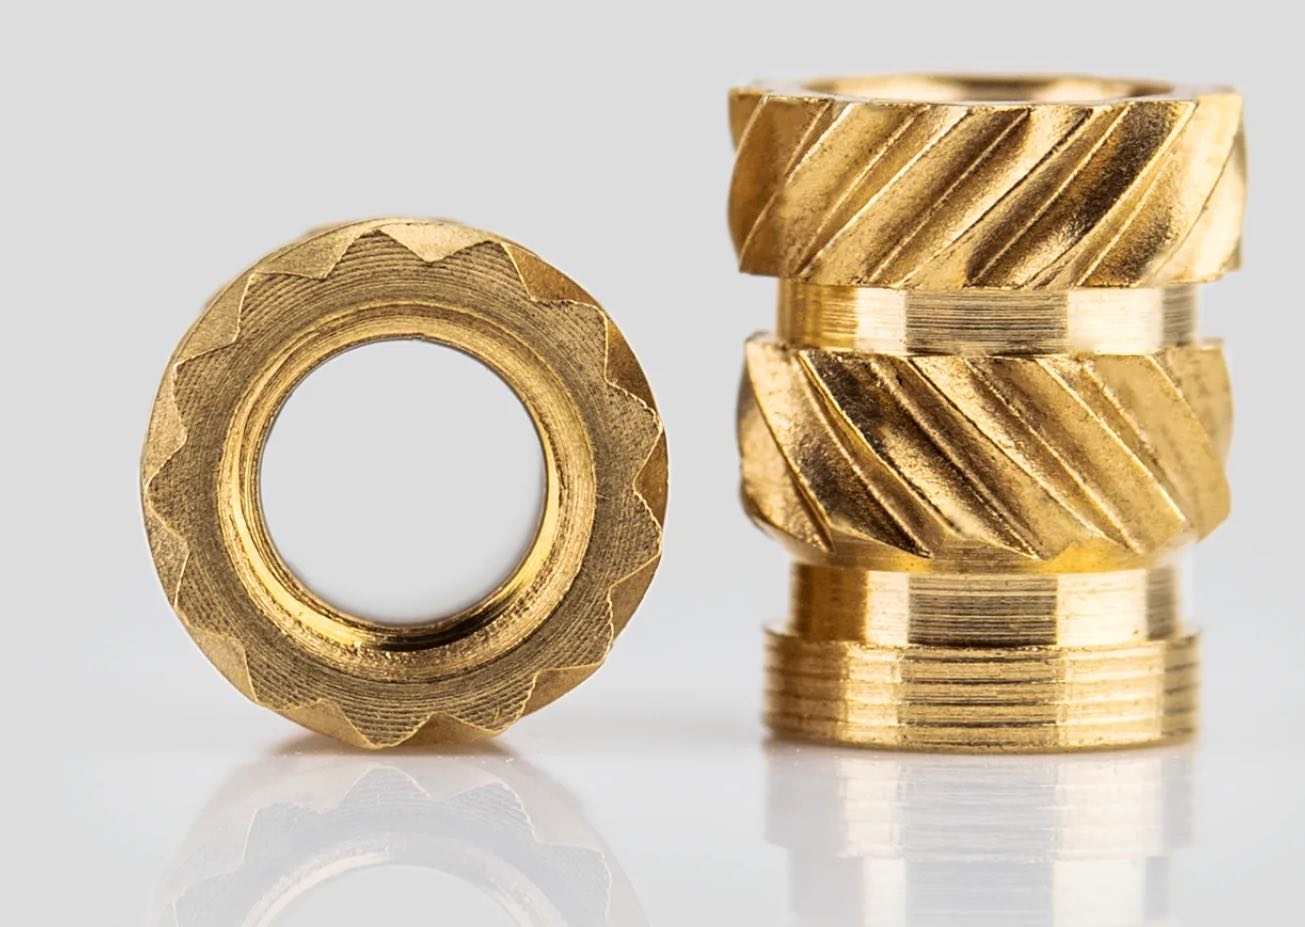
You can also get quality examples from McMaster-Carr who stocks an even wider variety in even more materials. There are other brands, but I've found these to be of the best quality and have never failed me. You'll also really want to get the soldering tips that will make it much easier to use (assuming your soldering iron supports either T18 or 900M tips). You'll definitely want to print the storage case and if you happen to have a Dremel 220-01 workstation, you can print an adapter that will let you use it to depress your soldering iron and ensure a clean insert at the correct angle.
Hackaday has a great article detailing how to design parts for threaded inserts and how to properly install them. I find using a temperature about 5C above the filament print temperature works well.
Todo
Video showing inserting these by hand and also using the Dremel workstation with adapter.
Comments or Questions?
If you have any comments, questions, or topics you'd like to see covered, please feel free to either reach out to me on Mastodon (link below) or open an issue on Github.